 |
| The "edge" of the 1/2 found. |
 |
| Centre drilled. |
 |
| Drilled through 4mm for the Sherline tommy bar. |
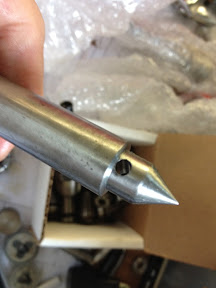 |
| Only to realize that I'm too close to the edge near the threaded portion. The plan calls for the hole to be 3/32" which will not be as close. |
 |
| Using the Sherline's tommy bar to remove the Centre for deburring. |
 |
| Photo shoot before milling away a portion of the taper. |
 |
| Mounted to the Base to hold it in the milling vise. |
 |
| Milling in process. |
 |
| Done. I couldn't go further with the mill as the edge of the Base blocked the endmill holder. |
 |
| Another look before hardening. |
 |
| After the first attempt in hardening. I heated the job till it glow and quench it in the little contain of water. I've had a hose near by (can be seen behind the torch) to spray water as standby. |
 |
| If you enlarge the pic, you should be able to see the scratches caused by a file. Hardening not done right? After I completed this part, I saw GeneK's comment on not directing the flame at the tip. Wish I read his comment before I started... |
 |
| While assembling the parts, I realized that the 1/2 Centre threaded portion extended out a little too much into the Base. |
 |
| The excess was carefully milled flush. |
 |
| Another attempt at hardening was carried out before putting the parts together. The cap screws provided are a little too long. They'll have to be shortened in the next session. |
- Posted using BlogPress from my iPhone
5 comments:
Wong, you are holding the part with pliers while you heat it. The pliers act as a heat sink. Get some thin wire, about 22 gauge magnet wire and wrap a small noose around the threaded portion and hang that into the flame. and you won't lose so much heat.
GeneK
GeneK,
Meant to ask you but it slipped my mind.
Will the wire get burn off and causes the part to drop? I'll go find a wire to try again.
Regards,
Wong
Wong, The torch probably could melt the wire, but you need to control where the flame is aimed better than that. Keep the hottest part of the flame on the large bulk of the part most of the time, let the heat conduct to the smaller part. If you heat the tip first it may burn and the heat will conduct from it into the larger part and cool before you can quench it. By heating the largest part first it will have a reserve of heat to keep the point hot enough to quench and harden.
GeneK
GeneK,
Sounds logical. I'll do the hardening again. On the part of using magnet as text, i reckon that the test is conducted after quenching? Looks scary to do it while it is still hot.
Regards,
Wong
Wong, I got thinking today about checking the temperature. Omega has temperature indicating lacquer that you paint on the part. It is flat and dull until it reaches the set temperature when it melts and becomes glossy. See:
http://www.omega.com/ppt/pptsc.asp?ref=LAQ&Nav=temf03
We used this at Data Electronics in the lab to verify the temperature ranges in the environmental test of the tape drives
GeneK.
Post a Comment