Thursday, December 30, 2010

A2ZCNC Leadscrews Upgrade - Fabricating the Z-Axis Antibacklash Nut Mount Part 1

After fixing up the Touch Plate Probe yesterday night (see A little mishap), I completed the squaring of the aluminium block and laid out the required dimensions.  This little block will be fitted onto the Antibacklash Nut from A2Z so that the precision leadscrew can be mounted on the z-axis to complete the conversion.  With the little time I had, I've to stop right after I completed boring the 23mm hole where the nut slide in to fit.

As usual, pics were taken along the way.  Here they are:

Started with drilling progressively bigger hole after center drilling. My boring tool needs a minimum hole size of 1/4" to start.  Being Singaporean (Kia Su syndrome), I gave it a 7mm.

The HSS boring tool in use.  Here you can see the layout lines and the circular mark on the surface caused by the shank of the tool rubbing against it.  The boring bar is a little short for the 25mm thick block.

Completed the "boring" operation.  The marking are almost gone... This is an inexperience machinist wannabe at work.

Test fitting the antibacklash nut. Can't insert it all the way yet as I couldn't bore all the way through the stock due to the cutting depth of the tool being a little short.  But the fit is rather good.
The back of the mount.  I didn't take pics of how I managed to mill out the portion left behind.  Deburring tool was used to remove the balance material.

Good fit.  I marked the 2 screw hole locations again using the digital height gauge.  They're right in the middle of the 2 mounting holes on the antibacklash nut.  I feel so proud of myself...

The entire process of boring out the 23mm diameter hole started with some fear of the stock moving out of the chuck.  The cut wasn't smooth at the beginning but I managed.  Spindle speed was rather slow to reduce vibration as the hole is not in the middle of the rectangular block.  As the length of the boring tool is less than the required depth of 25mm, I left a few mm at the back of the stock for cleaning up later.  Once I get the diameter of 23mm, I adjusted the tool angle to clean up what I can of the balance.  The rest was left for the deburring tool.


This is the same type of deburring tool I used for the final cleaning up. Mine has a blue and longer handle.

I hope to complete the nut mount by the next session, if time permits.  And if the A2Z horse shoe Stepper Motor Mount can be used, I'll have one less component to make to complete this mod.

When the precision leadscrew conversion is done, I'll move on to wire the spindle to the Gecko G540 VFD so that I can control the spindle rpm using gcode.  Then I'll have full automation (almost) at home :-)

Almost 1am now.  Better get some sleep.  Some appointments lined up tomorrow.

Wednesday, December 29, 2010

A little mishap

I've been using erniebro's touch plate micro (on cnczone.com) to zero the cutter before starting a job on the mill. It is really a time saver; no more jogging in small little steps of 0.01mm to zero by sight of all the 3 axes.

On Christmas night, it stopped working. Touching the 2 crocodile clips together (my "probes") didn't lit up the Touch Test LED in the Probe section. Couldn't figure out what happened after checking around for a while. So went back to manual zero'ing to complete the facing job to prepare the stock for the z axis mounting adapter for the A2Z leadscrew.

I kept thinking about what could have happened for the past 2 days and decided to check for connectivity of all the wires leading to the probes. Using a multimeter set to continuity mode, I probed the DB9 cable, the DB9 breakout board, and the wires connected to the crocodile clips. All perfect, nothing broken. Then I started connecting them part by part while testing continuity after each part was assembled. No problem found. Strange...

I decided to open up the controller box and look at what I've found:


The little wire (blackish one across the 4 pins on top) came loose from its soldering joint.
The 4 pins on the top row at the back of the DB9 socket is soldered together with a piece of hard wire. The black wire you see in the pic is the ground.

I took out my trusty made in China soldering iron to try to heat up the hard wire to melt the solder underneath it so that they'll stick.  Instead, the black wire came off the slot.  Couldn't seem to heat up the hard wire enough for the solder to stick.  Quite some time was spent trying to remove the solder from the slot using a soldering pump and trimming of the black wire to fit the slot.  Gave up using the hard wire.  A piece of jumper wire was stripped, laid across the 4 pins, and the joints soldered.  Ran some test before closing the cover to make sure it works.


Jumper wire soldered in place and excess trimmed off.

Now I'm back in business!

I've done some further work on the A2Z leadscrew hardware for the z axis.  Will try to post them up tonight if I've the time.

Saturday, December 18, 2010

A2ZCNC Leadscrews Upgrade - X & Y Axis Installation

We just returned from HK Disney, reaching home at about 2am this morning.  We were supposed to reach Singapore yesterday afternoon at about 5pm but due to some technical problem with the aircraft, the flight back was delayed for 6.5hrs.  Other than being too cold for most of us, the trip was a good one, especially for the kids.

Spent some time in the shop this afternoon trying to fix up the precision leadscrews for both the x and y axes.  The process was simple enough except for the smaller hole size on the Super Gibs for the fastening wire.  Had to enlarge the holes slightly.  Some play observed on x but let's see if its serious enough after some trial cuts.

As usual, some pics.

Table, saddle, and motor mount were stripped off and the base cleaned.


Placing the new saddle on the base to mark out the new Super Gib.

Sawing off the excess on both ends.

The holes provided are too small for the stock wire.

Enlarging the hole a little.

Another problem encountered: the hole for the wire came too shallow.  It was drilled a little deeper.

As the new leadscrews are much bigger than the stock, adapters are provided to rise the motor mounts on both x & y.

Both screws mounted. I didn't take pics of the installation of the antilash nuts on the leadscrews and the table as I was very frustrated with fixing up the wire and the gibs.

Some videos of tests done:

Moving saddle by hand to see if the gib is set too tight. You can see the cut I have on my middle finger. This was from trying to fix up the cable to stream video from my iPhone to the roof mount LCD player in my car.


Motion test:


Simple backlash test:


I'll be doing more test to see if the play on the x axis would create some problem.

Monday, December 13, 2010

A2ZCNC Leadscrews upgrade - The Shipment

Just when I thought I could only receive the shipment after my trip to Hong Kong, it arrived in my office today morning.  Took the chance to swing by to pick it up while going to 313 in Orchard Road with the family and mother-in-law.  The well packed box was sitting on my desk awaiting my arrival.


Well padded. No loose parts moving around in the box during the ride back.
After peeling off a thick layer of "onion skin", here lie the contends

The tubes are for the precision leadscrews.  I'm impressed! The screws I bought from Sherline were merely wrapped in brown papers.  Guess the price paid made the difference.

The rest of the parts out of their boxes.  The tube on the lower right is the Way-Oil.  The Gibs were said to perform better than the stock ones.  Both recommended by Tim of A2Z.

Anti-lash Nuts.  Spring loaded to take up backlash.  Some parts look a little worn.  They may be just tear-out, inflicted during testing.  Hope they work fine.

3 views of the saddle.  Look SOLID.  The blue colored strips are of the same material as the ones on the Gibs.


The adapter for the stepper motor mounts.  3 were provided of which 1 was given free of charge.  May not be using it on the Z-axis as that may require me to change the dimensions of the mounting driving the Z-axis saddle.  The plans were downloaded from Graham of Sherline Group.

I'll be leaving the country for the next 4 days starting tomorrow.  Hope to have sometime during the coming Saturday to install the precision leadscrews on the X and Y axis.  Z will have to wait as the backlash nut mount has to be fabricated first.  I'll be away again next Monday and Tuesday.  So little time yet so much to do.....

Tuesday, December 7, 2010

New Tools

I've been shopping online recently.  Including the outlay for the coming holiday, I'm over budget. But... I'm happy :)

Three of the five shipments came in last week, while I'm away in Melaka, Malaysia.  Took some photos to show off here.  The fourth shipment, by far the most expensive of the lot, is on its way.  Hope it reaches me before I take off to Hong Kong for my family holiday and at the same time, to pick up my fifth purchase.

So, what did I buy exactly?

ER16 Adapter with 3/4-16 threads. This is from Carter Tools.  Good support and prompt replies.  Very pleasant experience dealing with Carter despite the low priced item.

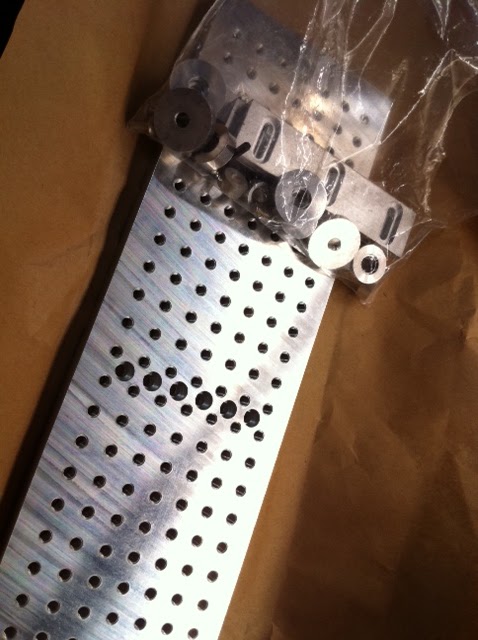
Precision Tooling Plate from High Tech Systems. Mounting holes and the slots at the back need deburring. Derick has also been prompt with his support.
Deburring the mounting holes with a countersink bit. No many holes.  So not so bad.
ER32 (per review on CarterTools.com) collet chuck from Beall Tool Company.  Ordered as a set with some imperial collets with a set of nice looking brass hinges for a good friend of mine.  Not much of a service to talk about as only one of my questions was answered.  Couldn't tell me if its really an ER32.
Front view with a collet mounted.  Look at its size relative to the lathe spindle.  It is mounted on the lathe with the 3/4-16 threads.  Have not tested the run-out.  Maybe after my holiday.
The fourth shipment contains the precision leadscrew upgrade for all my axes on the mill.  Tim of A2ZCNC has been rather helpful with my questions.  The order includes the 3 leadscrews, 3 anti-lash nuts, a saddle, and 3 gibs which Tim said are more superior than the stock gibs from Sherline.  Bought a bottle of #2 Way Oil which was said to be a better lube for the moving parts.

From the installation manual I downloaded, X and Y upgrade look simple enough.  Z requires some modification to make it work.  Tim was kind enough to throw in the adapter to offset the stepper motor mount to fit the new leadscrew.  I'll need to fabricate the mounting required to move the axis.  Plans and photos are downloaded from Graham of Sherline Group.  Hi Graham, thanks for the idea and plans!

The last purchase will be picked up from CTC Tools' office in Shatin, Hong Kong.  This will be my 3rd purchase from Haine.  This round 19 pieces of ER32 collets (metric) from 2mm to 20mm, a 2nd digital dial indicator (1" travel) to make my very own tramming tool from Bogstandard (John) build log on Madmodder.net, and a set of inside/outside radius gauge (1mm to 6.5mm radius).

Come to think about it, I've been buying but have not been building much things.  Need to have that in my new year resolution; to build more stuff and cut down on spending (though I enjoy buying... good form of stress release).

That's all for now, little one needs her milk and daddy is going to make her a bottle...