This part of the manual are all in German. Yahoo! Babel Fish was roped in to translate the parts I'm interested in.
P/N
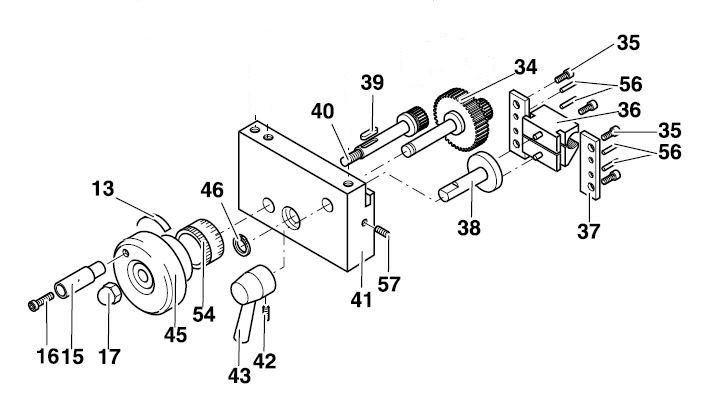
36 - Klemmmutter: Clamping Mother (Mothers that clamped down on kids???)**
37 - Blech: Sheet Metal
38 - Nocke: Cam
56 - Stift: Pin
57 - Madenschraube: Set-Screw
The labeling provided no more insight than when I started. But at least I know that part number 38 is a cam and half nut in German is clamping mother... lolz... just kidding.
** Edit: I found the actual translation on the web after looking at the exploded diagram of the gear train. In the gear train, the square nuts holding the gears were labelled as "Vierkantmutter", which Babel Fish translated as "Square". This leads me to believe "mutter" to be "nut". Therefore, Klemmmutter would be deduced as "Clamping Nut" instead.
By looking at the exploded diagram, I started thinking that I might be barking up the wrong tree. Truth is, from observing that the lead screw shifted upwards when the half nut is engaged, I thought that if I can some how adjust the half nut up a little, I can minimise that movement and I will have lesser of the binding feel when turning the lead screw handwheel. Apparently I'm wrong here. The cam has a fixed position on the apron and the 2 pins behind the half nut have their fixed positions on the cam. These leave me with nothing to play with to solve the problem of turning the handwheel. Till now, the function of part 57, the set-screw, is still a mystery yet to be solved. The fear of stripping its head trying to remove it stopped me from probing further. Could it be the toothed rack that the apron handwheel's gear rides on that needs to be adjusted? What about a bigger handwheel for the lead screw? Would that solve the problem?
Many questions left unanswered. I wonder if I should do whatever adjustments I can to make it smooth enough to go on to my next project or should I probe further to gain better understanding of how things work together. I've not turned the handwheels of another machines other than my own to know if what I have are already normal. Maybe I should hang around some machine shops, make friend with the owners, and request to play with their bigger machines. An owner of a shop on Toa Payoh Lorong 8, which sported some Chinese made, BP look-alike milling machines, seems friendly. I happened to walk past last year after visiting a client in the next block and stood there a about 5-10 mins watching him working on his mill. He turned around, saw me, smile, and went back to his work. I also have a client who owns a manual machine shop in Tampines Industrial Park. May be I can asked him if he is willing to allow me some time on one of his machines; not to do any work but to get a feel of a real machine.
6 comments:
I think behind 57 there is a small spring pressing a pin or ball.
On 38 there are two corresponding notches the pin or ball falls into in the two 'switch' positions.
I'm looking into this on my PD400 and I think there is litlle we can do. I to observe that the leadscrew moves up a little but I suspect that this might actually reduce the play.
I'm also looking at the handweel at the end of the leadscrew I suspect it rubs a little against the lathes cast iron bed. Perhaps inserting a small brass ring can solve this.
Regards,
Frank
Hello Frank,
Thanks for dropping by :-)
I don't think the handwheel rubbing against what the manual labeled as "bracket" is the issue. Without the half nut engaged, the handwheel turns smoothly. Once the half nut is engaged, it became rather hard to turn.
I think the "bracket" is called a bearing block or something and it seems to be made of aluminium on mine.
Hope yours is turning smoothly. What are you making with your lathe?
Regards,
Wong
Wong, after thinking about your problem with the lead screw movement. This just shows how perverse I can think. Part #38 has two grooves that engage the pins on the half nuts. These are the 'cams' that move the half nuts. I would make a new part #38 but offset the two grooves by the amount the lead screw moves. That way the half nuts will be lowered to the position of the lead screw. Yes I have done things like this to make things work differently. But I keep the original part to put it back right.
GeneK
GeneK,
Don't think I'm there yet... To try, I'll have disassemble the half nut. Need a lot of courage for me to do that.
I'll likely just put things back, adjust it till its not too stiff, and carry on with my next project. Still thinking about whether I should carry on with this or wait till I gain more experience to deal with it.
Regards,
Wong
Wong, understand, I just like to talk my thoughts out loud at times.
It's just like the doctor's oath that starts out "first, do no harm...' I know I frustrate my wife because I have to think everything through before I start. She has even bought venetian blinds at the second hand shop without measuring the window first.(no, they didn't fit)
GeneK
GeneK,
I may still need to do it but just not now. My current skill leaves much to be desired. Wish I can be like you folks.
Like your wife, I sometime make that mistake. The buy first sort out later mentality cost me both $$$ and space. Space because I can't bring myself to throw them away.
Regards,
Wong
Post a Comment